Although the information below refers specifically to the single handed fly rod, the mechanics for use with double handed rods are exactly the same, the only difference being, you would add an extra hand to make the cast work more efficiently with the double hander.
Why do we need to learn how to Roll Cast?
Well here are a few reasons!
- To straighten out a line on the water, prior to your chosen cast.
- Where there are obstacles behind.
- When fishing from a boat, especially with a boat partner, or in windy conditions.
- When fishing with a sinking line, the roll cast can be used to roll the sinking line back up onto the surface
prior to recasting, making life easier. - As part of a combination cast (roll cast into an overhead for example)
- To strike a fish that has taken the fly at the point when your rod is tilted behind you and the fly line and fly
have been fished out back to the bank, (or boat) prior to recasting. At this point, the rod can then be punched forward again into the roll cast to draw the fly back into the fish’s mouth and assist with hooking the fish. “Try it”. (single handed rod) - It is also a very important part of all the Spey Casts, which I will cover in the forthcoming articles.
Now that we know why we need the roll cast, let’s take a look at the mechanics of this cast.
Before we start casting, I cannot emphasise enough the importance of eye protection. This will not only protect your eyes from a stray hook, but if polarised lenses are employed, they will also assist in removing the glare from the water surface, and give you a visual advantage when stalking or spotting fish. A rimmed cap can also protect your head and deflect the glare from the suns rays.
 Ok let’s get started: Grip the rod handle firmly but relaxed, with the hand you are going to execute the roll cast with, (this may be influenced by whether you are left or right handed, or by the wind, as where possible casts must always be delivered from a safe position, therefore the wind can often be used to great advantage when casting). Do not deliver any casts if your fly line is blowing into your body during the set up of the cast, this will inevitably result in the fly hooking you. Using the wind to our advantage in this way, and why we do so, will become more apparent as we progress through the various casts.
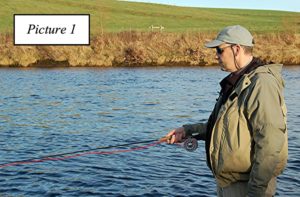
Always begin with the rod tip just above the water surface, (picture 1) as this allows you to begin the cast with the fly line under tension, therefore offering you the advantage of loading the rod from the outset. This is not as critical with the roll cast as it is with some of the other casts we will cover, but getting into the habit of doing this from the outset will prevent problems at a later date.
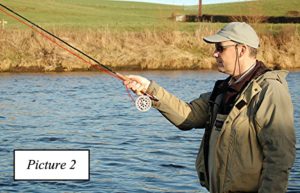 There are several grips available to us when casting, sometimes for use in a particular situation, and sometimes its simply personal preference, but for the purposes of continuity throughout the following articles, let’s stick with the popular “thumb on top” grip (for now) to avoid confusion. That said; place your thumb on top of the cork handle (above the reel) and in line with the rest of the rod. Now close your fingers comfortably around the cork handle, whilst at the same time making sure that the remainder of the handle (often known as the butt) is now resting comfortably underneath your lower arm. The rod is now an extension of your lower arm and can be moved to any position you choose using your thumb as a guide (picture 2).
Now place the appropriate foot slightly forward, and in the direction you are going to cast, (i.e. if casting with your right hand place your right foot forward, and if casting with your left hand place your left foot forward) this is also good practice when using the double handed rod, depending upon which hand is uppermost on the rod handle. However, this is only a recommendation, as you may not always be able to comply with this in a fishing situation, although there are several advantages to this recommendation: (a) for comfort, (b) to assist with balance, (c) to give you a firm base when stopping your rod on the forward cast, and the most important reason of all, especially when learning the cast for the first time, (d) it will help prevent your body from over rotating throughout the cast, and can therefore ultimately improve your tracking (keep the cast straight) for a more efficient outcome. It is often overlooked that your other foot should also be facing the intended target, prior to your cast; this too helps prevent tracking problems (i.e. the rod tip swinging in a curve, too far around behind your body when setting up and delivering the cast, making it difficult to maintain the desired straight line path to your target during the forward delivery).
Additional Information
It should also be mentioned at this point that some more advanced casters may adopt a neutral stance when casting, (e.g. both feet together) or they may even place their other foot forward. This may be born out of necessity depending where they are situated in the river. However, these casters understand the inherent problems that this may incur when setting up a cast and can easily compensate for that.
 In the case of a double handed rod, the section of cork handle below the fly reel would be supported throughout all of the movements of the cast by your other hand, (lower hand) and this lower hand will ultimately assist with the final delivery of your cast (see Double Spey).
Next: Lift your rod tip slowly to 45 degrees (picture 2) (this gets the line moving (under tension) and releases a significant amount of it from the water surface, making it easier to move it to the next position).
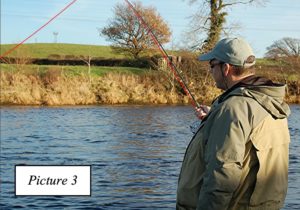
Now slowly sweep the rod tip and line around your body and out to the side, (picture 3) (this keeps the line at a safe distance away from your body during the set up of the cast). Make sure that the fly never leaves the water throughout this movement; if it does you are moving your rod tip into the next position far too quickly. “Slow down” you have all the time in the world.
Continue this slow sweep of the rod tip (and line) around your body to a position of 45° behind you, (picture 4). This should now be a mirror image of the position you created at the front with your initial lift.
Explanation
This 45 degree position allows for the maximum amount of line to be clear of the water, whilst still maintaining the largest D Loop you can achieve with a standing roll cast (the D Loop is your casting weight and the shape the fly line creates behind the rod, including the rod itself). Any further back than 45 degrees and you will drown too much line in the water surface resulting in line stick (i.e. the bottom leg of the fly line sticking in the water surface as you try to deliver the cast). Any further forward than 45 degrees will result in a smaller, less efficient D Loop, this will shorten the stroke length available to you for the forward cast, ultimately causing you to project the forward cast in a downward direction. This will also be the case if you raise your casting hand too high when setting up the back cast. Both of these things can be detrimental to any of the Spey casts, unless of course, you wish to drive your fly line and fly into an oncoming wind, in which case this can be an advantage.
I refer to the rod positions as 45 degrees, as apposed to 10:0’clock and 2:0’clock, as it is easier to identify these positions from either side of the angler, thus preventing any unnecessary confusion.
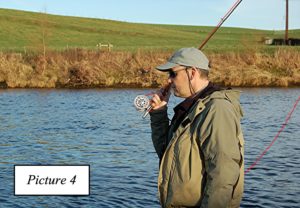 Now that you have taken your rod tip back to 45° behind, (picture 4) you have therefore presented yourself with a nice long casting stroke for the rod tip to travel through during the next stage of the cast (the forward cast). This will now allow you to bend (or load) the rod to good effect as it is accelerated forward (picture 5). You will also find that it is much easier from this optimum position to project your fly line higher at the front during the forward delivery, without your fly line sticking in the water surface (as discussed above).
Prior to delivering the cast, tilt your thumb, and therefore your rod tip slightly out from your side, this will help to make the cast safer, (keeping the fly line away from your body) and providing you maintain this tilt (or cant of the rod) throughout the forward stroke, it will also help you to maintain a straight line path of the rod tip throughout the delivery of the cast (as the rod compresses).
Now drop your casting arm down and into your body to a nice comfortable position. Remember, if you wish to deliver a high forward cast, it is much easier to do so if you start from a low position at the outset. You should only raise your arm high if you wish to pull the cast down at the front e.g. into a wind.
You are now ready to deliver the roll cast, but before you do, take a look at it, (i.e. the set up of the cast, including the D loop etc) you have all the time in the world, especially when using a floating line, which would certainly be my recommendation when learning this cast for the first time (or any other cast for that matter). It is much easier to progress on to sinking lines and tips once you have a better understanding of the mechanics of the cast you are using.
What to look for at this stage
(a) Make sure your rod is angled back to 45 degrees.
(b) Check that your thumb, and therefore your rod tip are tilted slightly out from your side.
(c) Make sure you have created that nice big D Loop behind the rod.
(d) Check that your fly line is always under tension (no slack line in the system).
(e) Confirm that your casting arm is in a nice comfortable position.
(f) “Don’t be in a hurry”.
 Everything up to this point, (prior to the delivery) has been done relatively slowly; However it is now a good time to point out that the fastest part of any casting stroke should be toward the end. This means that the delivery of the cast should start slow, (but meaningful) and gather momentum into a progressive acceleration, with the fastest part of that delivery at the conclusion of the forward stroke. It is at this point, (as with most conventional casts) that your thumb should now rotate into a definite stop. Imagine this process as if you are progressively stretching an elastic band, that you are about to snap right at the end of the casting stroke.
By compressing the rod in this way, (over the required stroke length) (picture 5) it allows you to transfer the energy stored in the rod (as the rod unloads) to your fly line, much more efficiently, rather like a spring unloading at the end of the forward stroke. If this is done smoothly and progressively, the cast will be fine. If you start the cast too fast, too early in the stroke, or too abrupt, you will not be able to progressively build up the compression in the rod as efficiently, and it will therefore load and unload the rod too abruptly before completing the forward stroke, thus causing the rod tip to take a concave path, resulting in a casting fault known as a tailing loop (in short, a tailing loop is a fault that will often cause the fly to catch up on the fly line during the cast). This fault is common across a range of casts.
Additional Information
A good cast can be almost silent, only making a very short noise right at the end of the casting stroke, e.g. (sh…) a tailing loop however, can often be identified by this noise occurring at the start of the casting stroke, too abrupt, (although there are other causes too). The noise that the rod makes during the cast can be one of the biggest indicators of how efficient that cast will be, therefore if a longer noise is heard throughout the casting stroke, e.g. (shhhhhhh…) this will often result in an poor outcome. Listen for these sounds as they are very good indicators of the efficiency of your cast.
As mentioned earlier, try to keep your thumb travelling in as straight a line as possible throughout this forward stroke, as if running along an imaginary diving board, stopping the rod tip high at the conclusion of the final delivery. If your thumb falls off the end of the diving board it will inevitably travel downwards towards the water with the rod tip and fly line following behind, not only creating a mess on the surface, but also causing any self respecting fish to dart for cover. (There are a couple of alternative ways of executing this cast to good effect, but let’s keep things simple for now).
Additional Information
When using the double handed fly rod, it is at this point that the bottom hand can be pulled back to increase tip speed at the end of the forward stroke, which in turn will increase line speed and assist with creating tighter loops (where required) for a more efficient forward cast.
 Whilst delivering your forward cast, try to avoid leaning your body forward (i.e. bowing to the water) during the forward stroke, as this can exacerbate some of the problems discussed above, i.e. projecting your fly line down towards the water, and in some cases contribute toward the possibility of a tailing loop. This is because, as a consequence of this forward movement, you will also inevitably “creep” your rod tip forward, (and down) therefore shortening the stroke length available to you for the forward cast, resulting in a rushed delivery as you try to accommodate the cast within the shorter stroke length now available to you. By rushing the cast you also run the risk of loosing that nice progressive acceleration that is paramount to achieving a desirable outcome. So simply think of your body as a fence post, stay relaxed, but do not bow to the water. The best delivery is the one that unrolls above the water, not the one that hits the water with a splash.
Additional Information
It should be noted that as long as the cast has been set up correctly, (no bowing) it “can” be delivered with a shorter stroke, especially when only moving a small amount of fly line, but it is much easier, especially when learning any of these casts for the first time, to utilise a longer stroke length throughout the cast. This will not only help you to slow down, but will also help you to create the progressive acceleration you require much easier. As implied above, consideration should also be given to the amount of fly line you are attempting to cast e.g. “A short stroke will shift a short to medium length of fly line” relatively easily, however, “A long stroke will generally move any length of line”.
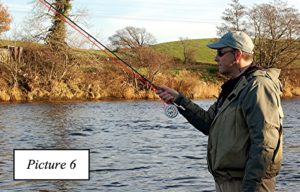
If you do need to extend your casting stroke, be aware that stretching your arm too far forward during the forward cast can also cause your thumb, rod tip, and therefore fly line, to travel in a downward direction, so don’t try to reach for the other bank, (unless you are carrying a longer line, but can still stop your thumb high). The safe bet though, at least until you understand the cast better, is to stop your casting arm (at the end of the forward stroke) so that it finishes up in the shape of the letter V, (picture 6) this will do two things, (1) it will make sure you stop your thumb high at the end of the forward stroke, (approximately 45°) and (2) it will also allow you to feel the flex of the rod to better effect when delivering the cast.
Additional Information
As mentioned above, when you become more proficient with the cast, you can extend your arm further on the forward delivery to accommodate a longer stroke, (where required) e.g. a more elongated V, but make sure your arm still displays some sort of bend at the elbow, because if this is not the case, and your arm ends up at full stretch, then once again you run the risk of projecting your thumb in a downward direction, ultimately causing the cast to deliver too low, often crashing into the water.
Finally
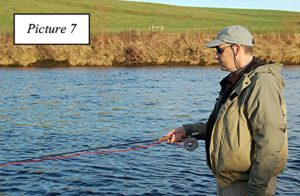 Following the required high stop at the end of your forward delivery, you can now lower your thumb, and therefore rod tip, at the same speed as the line leader and fly descend, so that they all land together in a straight line on the water surface for a nice presentation. This lowering of the rod must only be done after your thumb stops dead at the end of the forward stroke, otherwise the rod will not have been allowed to unload or “spring forward” correctly, making the forward cast very weak and untidy. You should now find yourself back in the position you started from at the outset of the cast, (picture 7) placing you in a relatively good position should your quarry decide to take your fly at this stage (the final position of your rod tip will differ depending on the type of fishing you are doing). You have now successfully completed the Roll cast.
When Salmon fishing with the double handed fly rod, you may or may not (at this stage) want to have a small amount of fly line hanging below your fly reel, readily available to be drawn away by the Salmon when it takes your fly, this is a personal preference and has long been a great topic for debate.
In the next article, I will be explaining how to make the roll cast much more efficient, and introducing you to the Jump Roll Cast.