Also known as the switch cast or accelerated roll cast.
Why is the Jump Roll cast more efficient than the Basic Roll Cast?
This is because we can now release more line from the water surface, to minimize our anchor and increase the size of our D loop.
Let me explain the above statement.
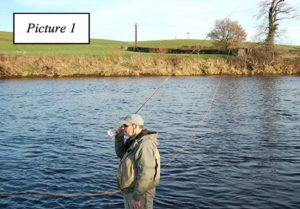 At the point in your roll cast, just as you are about to deliver your fly line and fly, take a good look at the D Loop you have created (remember, the D loop is the shape of the fly line behind the rod tip, including the rod itself, that takes the form of a capital D) (picture 1) You will notice that although you have your fly line nicely under tension, you also have a substantial amount of that fly line still stuck in the surface film of the water; (meniscus) this is always going to detract from the efficiency of the end product. It is this section of fly line that we now need to make better use of. To do this, you need to remove as much of this sticking line from the water surface as possible and place it into your D Loop, prior to the delivery of your forward cast. This will give you the minimum amount of fly line on the surface of the water, (sticking line) and therefore the maximum amount of fly line in your D Loop (casting weight).
Remember, no matter what you do with a standing (basic) roll cast, you will only be able to create a limited size of D Loop (under tension) behind the rod. Even if you stretch your arm out behind you, by the time you have come back to your delivery position the D Loop will often be no bigger, in fact you may even lose line tension, therefore creating slack line, causing the cast to be even less efficient. (There is a technique you can use whilst doing this to help you create a slightly bigger D loop, but it is a more advanced technique, and requires good timing, so let’s not complicate matters at this early stage).
Any fly line that is stuck in the water surface prior to the delivery of your cast is also referred to as your anchor. It is this anchor that is essential to creating any of the Spey casts we decide to adopt. The reason we need this anchor is that when we choose to Spey cast, it is often because we have obstacles behind us that we need to avoid (such as trees etc) and therefore we do not want our fly line and fly to travel too far behind us on the back cast (as it does with an overhead cast). It is this fixed position on the water surface (our anchor) that prevents our fly line and fly from doing this, therefore still affording us the ability to cast reasonable distances by what could simply be described as “folding our overhead cast in half”. This will also allow you to access places that were previously inaccessible to you in relatively restricted areas. So, imagine how efficient these casts would be if you could minimize this anchor point (less line on the water) and maximize your D Loop (more casting weight).
Enter the Jump Roll Cast
 (I hope you all have your eye protection)
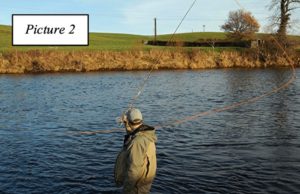
The Jump Roll Cast is effectively a roll cast slightly speeded up. The objectives of this cast, (amongst other things) are to address the points discussed above, which are (a) to create a much bigger D Loop behind the rod, (thus affording you more casting weight) (picture 2) and (b) to leave less line on the water surface prior to delivering the cast, (therefore less line to get stuck in the surface film as we make the forward delivery). These two things alone will (a) help us to load the rod more efficiently, whilst avoiding the trees behind with our flies, (b) assist with tightening up the forward loop, (where required) (c) improve our ability to cast to those difficult to target areas that have been previously inaccessible to us, and (d) still allow us to achieve the required distances for very little effort. This is not a change of direction cast at this stage (see single Spey).
How have we improved the Basic Roll Cast?
Let’s take a look without getting too technical. By applying additional acceleration to the cast, (after the initial lift to 45°) you have in effect applied a bigger bend to the rod as you accelerate it around your body during the back cast (unlike the basic, slower moving roll cast). Therefore when you now apply the stop at the end of the back cast stroke, the rod tip (or spring) unloads more efficiently creating more weight behind the rod in the form of a larger D Loop. Now as you deliver the forward cast, this additional weight you have created within your bigger D Loop, will help to bend your rod deeper as you progressively accelerate it forward again, so that when you deliver your forward cast, and this larger bend in the rod unloads, you will now have generated more line speed than you did with your normal standing (basic) roll cast. This in turn will cause the accelerating fly line to tighten up during your forward cast, (provided your thumb and therefore rod tip follow a straight line path) creating a (v) shape laying on it’s side (rather like this < ) at the front end of the fly line (picture 3). This is now a very efficient cast, and one that will also cut into the wind much easier if faced with difficult conditions. Line speed in conjunction with a straight line path of the rod tip will result in tight loops. However it is worth mentioning that you may not always require a tight loop in some fishing situations, e.g. when when using a team of fies (less tangles).
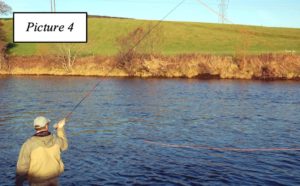 Ok, back to the aforementioned anchor point. Although we are attempting to remove as much line stick from the water surface as possible, (to help us create a larger D Loop behind the rod) thus incorporating most of the available fly line that is outside of the rod tip, it is also essential to have a small amount of fly line, (along with our leader and fly) touching down on the water beside you (minimum line stick). This is what we call our anchor “point”, as it locks into the surface of the water, thus allowing us to create maximum casting weight (D Loop) behind the rod, ready to be drawn into the forward delivery. Where possible, this anchor point should touch down on the water surface just out to the side of your casting shoulder prior to the forward delivery (picture 4). (approximately one to one and a half rod lengths away from you) This allows the maximum D Loop to form between the rod tip and the aforementioned anchor point on the water, therefore assisting with the loading of the rod as it is delivered into the forward cast by you, whilst at the same time allowing you to deliver your fly from a safe position off the water surface.
How do we do this?
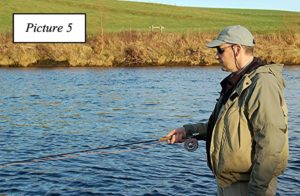
Start the cast with your rod tip pointing downstream, (on the river) straight out in front of you, and just above the water surface (picture 5). If you are holding the rod with your right hand, or in the case of a double handed rod, you have your right hand uppermost on the rod handle; place your right foot slightly forward, (as explained in the roll cast). The initial lift is exactly the same as the roll cast (raising the rod tip to 45o) and the next stage is also the same movement as the second stage of the roll cast (sweeping out and around to the side). The only difference this time, is that there should be a slight increase in speed, because unlike the roll cast, your fly must now leave the water, only touching down again when reaching the desired anchor point position (as described above). Keep this movement smooth but meaningful!
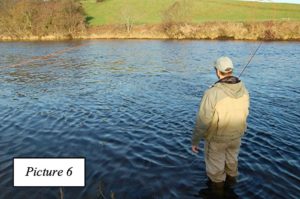
 Whilst doing this, you can (initially) use the rod tip as a visual aid, (see additional information below) so that when you start to sweep it out and around your body, you will see the rod tip begin to bend under tension (you will also be able to feel this). It is at this point that you must progressively increase the speed of your sweep, whilst at the same time, drawing a “very” shallow arc with your thumb (rather like a hammock between two trees). At around 45° out to the side of your body the rod will have taken a significant bend, (Picture 6) it is at this point (whilst continuing along the aforementioned shallow arc) that you should now be raising your rod tip back up to the 45° position behind you, (to where the other end of the hammock would be tied to the tree) but still canted out to the side (Picture 4). Stop your thumb firmly at the 45° position behind, allowing the bend you have created in the rod to unload at the end of the stroke, (rather like a spring unloading) in turn, allowing your D Loop to form, up and away from the water surface, (Picture 4) and in line with the direction you are making your cast ready for your forward delivery (just like a big wheel ready to roll forward).
Additional Information (Visual Aids)
Visual aids can be very useful when Spey casting and you will notice, in the paragraph above; I have made reference to watching your rod tip at the start of the sweep, thus allowing you to see the rod tip bending under tension. When you first start Spey casting this can be a great visual indicator of what is happening at this stage of your cast and it is also a good teaching aid in these early stages. However, in brackets, you will also notice the word (initially). I have included this because when you have practiced this sweep for a while, you will inevitably begin to “feel” the rod bend, (or load) whilst doing so, “this is much more important” and once you are comfortable with this feeling there will be no further need to watch your rod tip during this stage of the cast. This is because, as you improve your Spey casting techniques, there are more important visual aids to be aware of that will definitely help to improve your casts, especially at this stage, such as watching your fly line lifting from the water all the way to your fly before going into your sweep. This will then get you into the very good habit of watching your fly line, leader, and fly, travel all the way round to your anchor point position out to the side of your body (casting shoulder) during the sweep, allowing you to see exactly where it lands on the water, therefore assisting with the timing of your delivery. Once you have reached this stage, you are definitely on the right track as this will assist you with a consistent anchor placement, which is essential to a good cast.
 If the energy applied to the sweep is correct your fly will be lifted from the water in front of you, follow the path of your rod tip, and be transferred, along with your leader and a small amount of fly line, to a position out to the side of your casting shoulder (as defined earlier) where it will fall onto the water, automatically creating your anchor point and maximizing your D Loop. It is worth noting that wherever the centre of your shallow arc (hammock) bottoms out (i.e. at the point where you begin to raise the rod again during the back cast) is where your fly will
inevitably land on the water. As soon as your fly has touched down, the forward cast should be delivered with a smooth progressive acceleration. Too early, and the leader will slip, flick your fly backwards, and cause an audible click in the air. Too late, and the bottom leg of your D Loop will collapse onto the water creating additional line stick, causing a slurping noise as your fly line tries to pull clear of the water surface on the forward delivery. Remember all you are trying to achieve is to keep tension on your fly line throughout the cast (no slack line). Smooth and progressive is the key.
Just a quick recap
Your aim, prior to the delivery, is to create a mirror image (when your rod tip is behind you and canted out to the side) of your initial 45° lift at the front, but this time creating a much bigger D Loop behind the rod than you did with the basic roll cast, this is done by placing an anchor point on the water no more than a rod and a half length away from your casting shoulder. The anchor point should consist of the minimum amount of line on the water; Preferably, tip of fly line, leader and fly, and your D Loop should consist of the maximum amount of line available to you (outside the rod tip). Do not take the rod tip behind your back as this will set your D Loop at the wrong angle causing you to swing the forward cast, which is one of the reasons (as well as for safety) that the rod tip should always be canted out from your body. The D Loop must be lined up with your target prior to the final delivery, which is often referred to as the 180o rule (180 degrees to your target, or in simple terms, set up directly opposite).
Minor adjustments
At this point, if you are having problems creating your anchor point, e.g. constantly missing the water surface, you can do one of two things (or both where required). First of all try reducing the speed at which you are sweeping your rod tip (and therefore your fly line) around your body, (which often cures this problem). If this does not help, try deepening the shape of your hammock as you sweep your rod tip around your body, (your shallow arc may be too shallow) before raising it back up to your 45 degree position again prior to your delivery, (a bit like drawing a smiley face or crescent moon shape with your rod tip) this may also solve the problem. You will often here people referring to this movement as a “dip” of the rod tip, but be very wary of the word “dip” as people interpret this in many different ways, and in some cases it’s interpretation (if the dip is too steep) can contribute to the angler crashing the fly line leader and fly downward and into a pile on the water. Remember, gravity will help your anchor point to occur naturally if the speed and angle of the sweep are correct.
Reminders
You will remember in article 1 The Basic Roll Cast. I explained that the fastest part of any casting stroke is toward the end, and that if you imagine your rod tip is attached to an elastic band, all you will need to do is progressively stretch that elastic band to it’s extremity throughout each stage of the cast, (either the back cast or the forward cast) it is then and only then that you may snap the band right at the end of each stroke (allowing the rods spring to unload naturally). Don’t be over zealous at this point, as the snap is simply a dead stop and not an aggressive movement. Just think of all these movements as smooth progressive accelerations to a dead stop, and once again, “do not be in a hurry”.
Bearing all this in mind, if you are now delivering a smooth progressively accelerated forward stroke and snapping the elastic band at it’s conclusion, whilst at the same time rotating your thumb into a dead stop, then you are most likely to be executing the cast correctly, and by stopping the rod tip high (e.g. 45°) at the end of the forward stroke, you should now have created a nice forward delivery.
Always remember that although the rod tip is tilted out to the side of your body when setting up your D Loop, (Picture 4) the rod tip (driven by your thumb) must always maintain a straight line path throughout the delivery of the forward cast. This means that your thumb and therefore rod tip should continue to follow this outward tilt throughout the forward delivery. Avoid bowling or swinging the rod tip on the forward cast as this will result in either a very open forward loop of fly line, often falling in a heap at the conclusion of the cast, (bowling) or a tracking problem resulting in a curving (swinging) of the fly line as you deliver the cast. Remember, the fly line can only follow the path of the rod tip.
Additional Information
It should be noted that open loops and curves in your fly line can be very useful in certain fishing situations, and where this can be controlled by the angler, it will offer up several advantages, however, that is something to be discussed at a later date once the basic mechanics of these casts are mastered.
Finally
 When you are happy that your cast is very smooth and progressive throughout, you are now ready for closure. Here’s what to do. After the stop on the forward cast lower your thumb, and therefore rod tip, at the same speed as the line leader and fly begin to fall, so that they all land together in a straight line on the water surface, allowing for a good presentation and once again arriving back at your start position with your rod tip just above the water surface. You have now successfully completed the Jump Roll Cast and are ready to go again.
These are the basic mechanics of the Jump Roll Cast and if used regularly, (practiced) will give you a greater understanding of the principles of Spey Casting, but it is not until we add a change of direction to this cast that it then becomes much more versatile and very useful to us in a fishing situation, especially on rivers when faced with flow and wind conditions. This change of direction coupled with an upstream wind scenario is what will influence our choice of cast in the next article, prompting our decision to change to a Single Spey Cast.