Do we need to restrict ourselves to a Single Spey Cast in an upstream wind situation?
The answer is No, as we have alternative options in the form of the Snap T & Circle C casts. Both casts enable us to keep our D Loop on our upstream side if faced with an upstream wind.
As mentioned above, these casts are simply alternatives to the Single Spey cast, and although they can also be used effectively on calm days (when there is no wind at all) it is comforting to know, (and important) that like the Single Spey cast, they too can be used safely in an upstream wind situation. Not only can they be introduced into your armoury simply to break the monotony of Single Spey casting, but amongst other things, (which we will visit below) they can also be easier to control than a Single Spey cast, especially in a strong upstream wind scenario. Here’s why!
The Snap T
In my opinion, the Snap T cast is not a cast you should try before first learning the Circle C cast, as there is less room for error with the Snap T, and therefore if executed incorrectly it is not as safe a cast as the Circle C cast can potentially be. This is because, whilst executing the Snap T cast, the fly will often pass the rod tip in close proximity, and in some cases, (if done incorrectly) will actually collide with it, especially if it is a cast you are just getting to grips with. However, once mastered, it can be a great asset and one that will become very useful to you in difficult situations, especially along river banks where there are overhanging branches and other obstacles to contend with (later mentioned below).
That said, you may be wondering why I am about to explain the mechanics of the Snap T cast first, as apposed to those of the Circle C cast. This is because, (in my opinion) from an informational point of view, it is easier to explain the transition between the two casts in this way, so that when you eventually learn both casts and venture out onto the river, it will hopefully be easier to differentiate between the two, therefore understanding them better. I will let you decide!
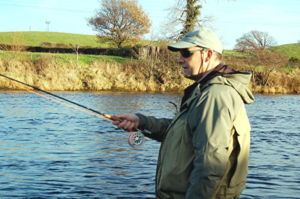
Image 1
Here we go! To start the Snap T cast, first face your target out into the stream, (as you did with the Single Spey cast) also as before, make sure that your rod tip is pointing downstream towards the fished out fly. “For now” raise the rod tip to 45 degrees (picture 1) this will once again release some line from the water surface (this upward lift may not be necessary once you become more proficient with this cast). It is at this point where the Snap T cast differs from that of the Single Spey cast. So, from this elevated position, (picture 1) the rod tip should now be “progressively accelerated” upstream in a straight line path, (directly in front of the angler) and to a position of around 45° upstream of the angler before continuing into the next movement. (Once again, as your cast improves, this stroke length may be altered to enable you to manipulate your anchor placement on the water, and the upstream lift will also be performed with a slight incline if beginning your upstream sweep directly from the water surface, however, as implied, this technique should be reserved until you have a better understanding of the cast).
Explanation
This straight line path in front of you will be dictated by the angle you are facing e.g. if you want to cast 45 degrees out into the river the angle you will initially be facing will also be 45 degrees, and if you want to cast 90 degrees out into the river the angle you will initially be facing will be 90 degrees. Therefore the straight line path that the rod tip must take to pass directly in front of you will differ depending on the direction you want your cast to go. The easiest way to remember this is: Start with the rod tip pointing downstream with your fly in the fished out position, face your target, and wherever you are now facing, simply draw the required straight line path in front of your face (picture 2).
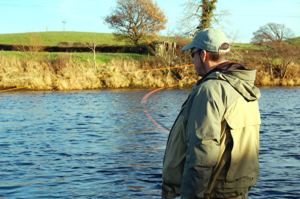
Image 2
At this point, immediately following the progressively accelerated upstream path of the rod tip, the rod tip should now be cut underneath the top leg of the moving fly line, this is done with the introduction of what could be referred to as a downstream chop, (picture 2) (rather like chopping into the side of a tree with an axe). After this chop, the rod tip must then be smoothly drawn back downstream and into your bank, on the same straight line path from whence it came, ultimately reaching the position it was in prior to the start of the cast, (rod tip just above the water surface) i.e. pointing downstream towards the fished out fly. You will notice in (picture 2) a similar shape (with rod and line) to that of a Capital T (hence the name Snap T cast).
Additional Information
If you are still not sure about the angle of the straight line path that the rod tip must take throughout the progressively accelerated upstream and downstream movements of this cast, then simply stick your arms out from the side of your body, (like an aeroplane) whilst facing your intended target and the angle between these two points is the straight line path the rod tip must travel during these movements.
The downstream chop will assist the momentum of the fly line as it travels upstream (helping to maintain line tension) and therefore projecting the fly onto the water upstream of the angler and into the required anchor point position, approximately a rod to a rod and a half length out from the anglers casting shoulder (the same position as the Single Spey cast). If these initial movements of the cast are performed correctly then you will find that you have an almost guaranteed anchor point position on the water. A distinct advantage over the Single Spey cast (the fly line and fly will only go where the rod tip sends them).
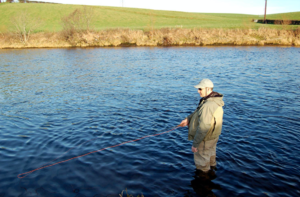
Image 3
Following this chop, or snap, as it is so called, because you have smoothly drawn your rod tip, and therefore some of your fly line, back downstream again and into your own bank, (picture 3) whilst at the same time, catapulting your fly upstream and into your anchor point position, you have now presented yourself with the opportunity to make a long upstream sweep again with your rod tip, which is a requirement of the next stage of the cast. It is this long sweep that affords you the luxury of being able to move the fly line (that is now laying on the water in front of you) in a much more controlled manner, enabling you to create a large D Loop on your safe wind side, exactly as you would have required for a Single Spey cast. To do this you must now sweep the rod tip upstream and around your imaginary “tilted” Sombrero (see article 3) as if you were taking it up and around a spiral staircase from the bottom step to the top step (as you reach the top step of this spiral staircase, do not take the rod tip any further back than 45° and keep it canted out to the side prior to the delivery of the cast) (picture 4). You have now once again created a large D Loop on your upstream side, rather like a big sail filled with air, whilst facing the direction to which you are going to deliver your fly. You have already predetermined your anchor point position, and your wheel (D loop) is ready to roll, i.e. by applying a progressively accelerated forward delivery (as discussed in previous casts).
Explanation
If you did not continue into the downstream draw with your rod tip, following the snap, and simply left your rod tip pointing out in front of you, at the position shown in picture 2. Your fly would then travel too far upstream, causing your anchor point to land too far away from you and leaving you no significant sweep available to create an efficient D loop to set up in line with your target. Try it and see!
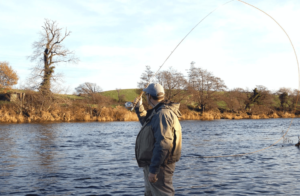
Image 4
Depending on your location, e.g. where you are often faced with difficult situations such as overhanging trees etc. and a Single Spey cast, or for that matter, a Circle C cast (or Circle Spey as it is often called) cannot be used because you would run the risk of throwing your fly line into the low branches of the trees, then the Snap T (and variations of this cast) will inevitably become very useful. Given these particular situations (especially once you get to grips with this cast) your fly line, leader and fly can be accelerated from a downstream position (under low branches etc) directly from the water surface, without that initial high lift, enabling you to keep the fly line low and avoid contact with the overhanging branches. The point at which you make the snap (or chop) can also vary, allowing you to manipulate your anchor point position.
Trying it for yourself
Experiment with this cast using a piece of wool on the end of your leader, (as apposed to a fly) as this is a much safer approach, especially when learning any of these casts for the first time, and finally, please note that the Snap T cast is not a user friendly cast when used in conjunction with large heavy flies and sunk lines, especially if you value your rod tip, which brings me nicely onto a cast that can be used in these situations: Enter “The Circle C cast”.
The Circle C cast
This for me is the more user friendly of the two casts to perform, and although you could argue that the Snap T can be a definite advantage in more confined spaces, such as overhanging trees etc. (as discussed above) the Circle C is a more versatile cast and can be executed in a much safer and leisurely manner, especially when attempting these casts for the first time. Here’s why!
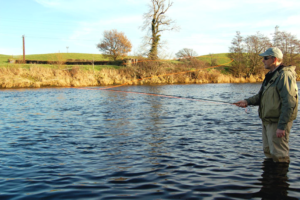
Image 5
The main difference (visually) between the two casts manifests itself in the shape created in the air in front of the angler throughout the initial upstream and downstream movements of the individual casts, prior to the sweep into your D Loop. Unlike the Snap T cast, the initial movement of a Circle C cast is a wide circular rotation of the rod tip, as apposed to the much narrower path taken by the Snap T cast. This wider rotation also allows us to move longer fly lines more efficiently (where required) and affords us a much more relaxed approach to the cast from the outset.
Let me explain this further! Instead of the straight (or even slightly inclined) upstream acceleration, and chopping of the tree with the axe that we discussed in the Snap T cast, (picture 2) which certainly gives you a faster, tighter upstream casting loop that could potentially cause the fly to come very close to your rod tip, (picture 5) a simple circular movement of the rod tip can now be introduced into the cast. This circular movement is in the shape of a capital C (hence the name Circle “C” cast) or alternatively, an inverted capital C depending on which bank you are fishing from (remember these casts can both be used safely and efficiently in an upstream wind, regardless of which bank you are fishing from, as long as your D Loop is created on your upstream side).
So here we go. Raise the rod tip to 45°, (as in the Single Spey cast and the early learning stages of the Snap T cast) but this time continue into a very circular movement in the form of a large capital C, or inverted C, (as described above) depending on which bank you are fishing from (Left Bank, inverted ) as shown in (picture 6) and right bank, (normal C). Continue around this C shape with a progressive acceleration, (as always) once again drawing your rod tip smoothly and continuously on until it is pointing back downstream and slightly into your bank as before. Everything from now on is exactly the same as the Snap T cast.
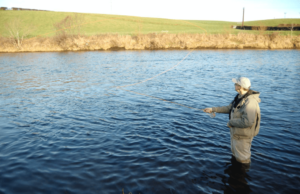
Image 6
All the rules we covered in the Snap T cast with regard to angles and straight line paths etc. still apply, the only significant visual difference (at this stage) is the more open (C) shape you have now created, as apposed to the much flatter (>) shape created during the Snap T cast (picture 5). As long as you rotate the rod tip in the direction you want your fly to land on the water, the anchor point will still be directed to the same place as it was in the Snap T cast (off your casting shoulder). However, your fly, or flies, will now be much further away from your rod tip during the set up of the cast, therefore creating a much safer scenario.
The most significant and noticeable differences with this cast compared to the Snap T are two fold (a) the distance that your fly, or flies, are away from the rod tip during the initial circular movement of the cast, (as described above) and (b) the amount of time available to you throughout the set up of the cast, which actually allows you time to observe what is happening during this process. This is always a big advantage.
Remember, (as discussed earlier) to complete the Circle C cast everything after the Circular movement of the cast (e.g. returning your rod tip back downstream etc) is exactly the same as it was in your Snap T cast, including the upstream sweep (to create your D loop) and the delivery of the cast. The only variable that may influence the two casts at this point, is the angle of the climb (upstream sweep) around your imaginary Sombrero, (spiral staircase) as this will be determined by how much space you have available to you during this sweep, e.g. where a Snap T is employed, under overhanging branches etc, the climb (or incline) will be much shallower than it was in the Circle C cast to avoid your fly line catching the low branches. If all of these things have been executed correctly then your Circle C cast will also be successful.
Additional Information
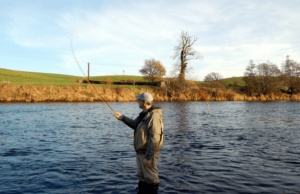
Image 7
You may remember, at the beginning of this article, I mentioned that the Snap T and Circle C casts can be easier to control than a Single Spey cast, especially in a very strong upstream wind scenario. This is because, during the upstream sweep into your D Loop, (after the circular movement) you are actually using the surface tension of the water to grip your fly line, leader, and fly, which in turn, allows you to stay in better contact with the cast as you peel it from this surface tension and all the way around the climbing sweep (spiral staircase) to create your D loop (often referred to as a sustained anchor). This therefore affords you much more control over what you are trying to achieve during the final set up stages of these casts, which is (as with all Spey casts) simply to recreate your basic roll cast position (albeit with a larger D Loop) as efficiently as possible, prior to the delivery of the cast (this surface tension also assists with the loading of the rod, helping you create this larger D loop).
The additional control that these casts can offer you can be a great advantage over the Single Spey cast, especially when you have a very strong upstream wind in attendance. Given this scenario when using a Single Spey cast, your D Loop can often get away from you (loss of control). This is partly due to the fact that because you have to lift your fly line clear of the water, guide it around your body during the upstream sweep, then place it quite accurately into your anchor point position, your fly line (or D loop) can often be taken away from you in these very strong (upstream) windy conditions. This scenario can often make your cast very difficult to control, especially when learning the Single Spey cast for the first time, as your anchor point will often be inconsistent and therefore will only exacerbate the problem. However, in these very windy conditions you’re Snap T and the Circle C casts can give you that additional control and anchor consistency you are looking for, offering you a distinct advantage over the Single Spey cast, because if set up correctly, (see explanations above) your anchor point positions with these casts are almost guaranteed.
The Snap T and Circle C casts can also be used efficiently with both double and single handed fly rods, not only for traditional Spey lines, (in the situations explained earlier) but they also lend themselves very well to shorter lines such as shooting heads (both Snap T & Circle C) and Skagit lines, (predominantly used on double handed rods) when very fast sinking tips and large flies are a requirement, (“Circle C only”). The Circle C cast will lift these lines relatively easily (even sinking lines) and lay your fly, or flies out straight on the water (into your anchor point position) during the circular movement of the cast, e.g. less chance of your flies tangling with the leader, or hitting your rod tip. Also, if executed correctly, (as mentioned above) both casts will almost guarantee your anchor point position prior to the delivery of the cast.
Another advantage of the Circle C cast, when fishing for Trout or Grayling with your single handed rod, is when using a team of spiders, or a couple of heavy bugs, as your flies will once again lay out in a straight line on the water following the circular movement of your rod tip. This allows for a clean delivery of your flies into the forward cast, with no chance of a tangle developing from a crashed anchor (i.e. your fly line, Leader and fly, landing in a heap when reaching your anchor point position). This is always a possibility when using a Single Spey cast, causing a monumental tangle and ultimately wasting valuable fishing time, either untangling the mess, or having to make up a new leader. As you can see, it definitely has its uses.
When we are using these casts in a fishing situation, the cast that is most commonly made (where possible) is actually a combination of the two techniques, therefore a more oval shape is adopted, as apposed to the sharp Snap (of the Snap T) or the wide Circle (of the Circle C). This approach is actually quite comfortable, very efficient, and will cover most upstream wind situations.
Finally, always remember that with all of these casts, once your D Loop is formed, deliver the cast reasonably high and straight, to assist with distance and presentation. (picture 7).
In the next article I will be taking a look at the Double Spey cast, and why we need to be ready to change to this technique (when required) at the drop of a hat.