What is a Snake Roll Cast? Where would we use a Snake Roll Cast? Why would we use a Snake Roll Cast?
These are just some of the questions I am often asked with regard to the Snake Roll Cast, so within this article I would like to address these questions, along with a few others, and hopefully explain them in more depth.
In simple Terms
The Snake Roll cast is simply a Spey cast that incorporates a full rotation of the rod tip to reposition the fly line, leader and fly on the water prior to the delivery of your cast, predominantly when there is a downstream wind in attendance, which is why it is often used as an alternative cast to the Double Spey cast. However (as with all Spey casts) it too can be used in a nonewind situation, but like the Double Spey cast, a downstream wind will assist with making this cast much more efficient and much safer.
As discussed throughout previous articles we all know by now that there are always reasons for every movement we make during each section of a cast, and this cast is no exception. So let’s dig a little deeper.
Apart from the obvious reasons for using a Spey cast such as obstacles behind, wind direction, safety and so on, this particular cast can be very effective on so many different levels (especially in a fishing situation) as it allows us to do several things quite efficiently, such as:
- Lift a significant amount of line in one movement.
- Easily compress the D Loop to make it more dynamic.
- Keep the rod tip low when space is an issue.
- Maximize your D Loop much more effectively.
- Change direction very quickly when necessary.
- Make large directional changes relatively easily.
To name but a few, but how do we do all of these things? Once again we need to understand the mechanics of the cast to get the best from it, so here goes:
General Information
 Although the Snake Roll cast is designed to be used safely in a downstream wind, (just like the Double Spey) and therefore often used as an alternative cast to the Double Spey, this by no means suggests that it is a replacement for the Double Spey, as they both have their individual uses (advantages and disadvantages). For example: If you were using a sinking line in conjunction with say, a two inch brass tube, (in a downstream wind) the Double Spey cast would be a much safer cast, (as apposed to the Snake Roll) because your heavy fly would remain in the water throughout the set up of the cast (unlike the Snake Roll). Alternatively, the Snake Roll cast may be chosen over the double Spey cast when a quick directional change is required, e.g. to get to a rising trout, (single handed rod) or to target a salmon that has just showed out in the stream (usually with a double handed rod). All things should be considered in a fishing situation!
The starting position
From the outset of the Snake Roll cast, with reference to stance, grip, arm positions, or whether you are on the left or right bank of the river, (all of which have been discussed in previous articles) everything should begin in exactly the same way as they did with the Double Spey cast, including the fly line leader and fly being in a fished out position below you (downstream) (see article 5). You should also remember to keep the rod canted out to the side during the initial rotation (and delivery) of the cast, (also discussed in article 5) or you may find the fly coming very close to you during these movements.
The Initial Rotation of the Rod Tip
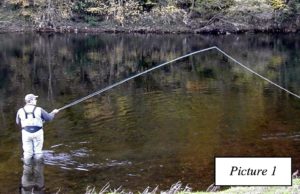
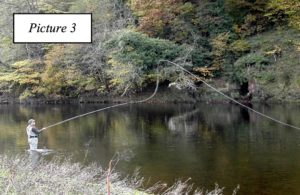
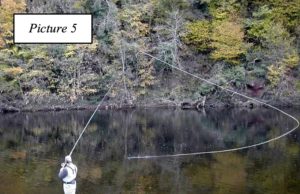
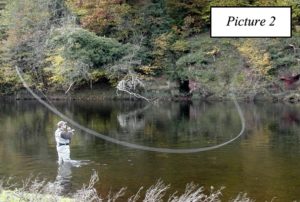 First of all, lift the rod tip (where possible) to 45° (picture 1) (to release some fly line from the water surface) then make a progressive acceleration in the shape of a circle around this initial rod tip position. If you are on the left bank of the river, this circle should be made clockwise, (with your left hand uppermost on the rod handle), and if you are on the right bank of the river, this circle should be made anti – clockwise, (with your right hand uppermost on the rod handle) (picture 2). This rotation will initiate two important things, (a) it will lift your fly line leader and fly from the fished out position downstream of you, giving them no other option but to follow the path of the rod tip during its rotation through the air, (picture 2) ultimately laying out the fly line leader and fly on the water again in the (new) direction of your intended target, and (b) it will also allow you to create the required D Loop behind the rod tip, (casting weight) to make the cast efficient, as the rod tip should finish up in line with your intended target, i.e. the 180° rule (see page 3 The Jump Roll Cast). Before delivering the cast simply practice rotating the rod tip (picture 3) and observe the effect it has on your fly line leader and fly, this will give you a better understanding of what you are trying to achieve before moving on.
Creating your D Loop
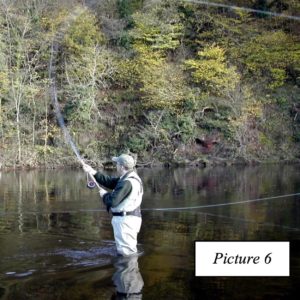
 After practicing for a while with this rotation of the rod tip, (each time allowing the end of the fly line, leader and fly to land on the water, in the desired anchor point position) it is now time to deliver a forward cast. We can do this by utilising the casting weight we have been creating behind the rod tip whilst practicing, (better known as the D Loop) as this helps to make the cast much more efficient. You will have noticed by now, that by drawing the rod tip back to 45° on completion of your circle, (picture 2) whilst at the same time keeping your rod tip slightly canted out to the side of your body (again see D Loop article 5) that you have also been assisting with the enhancement of this D Loop. You will find that not only has this (canted) draw back helped to keep everything in line with your intended target, (good tracking) but it has also allowed you to set up your D Loop in a much safer position, (away from your body) whilst at the same time helping you to stay in contact with your fly line more effectively (line tension) and presenting you with a longer forward casting stroke, affording you a much more relaxed and comfortable delivery.
Delivering the cast
As the delivery of the cast has been discussed in all of the previous articles I am not going to bore you by covering old ground, but will simply revisit the fact that your final delivery should maintain a straight line path throughout the forward stroke, accompanied by a smooth progressive acceleration to a stop at around 45° at the front (where possible) with the emphasis on a nice high delivery (if conditions allow). The delivery of any Spey cast with a double handed rod can be improved by making sure that you are also using your bottom hand to good effect during the casting stroke, especially toward the end of the forward stroke (see article 5 The Double Spey page 4). If this is done efficiently it will also help you to feel the rod loading progressively, building up the cast throughout the stroke, and allowing you to utilise the rods spring to better effect at the conclusion of the cast. Always remember, when introducing your bottom hand to the cast, (i.e. the one on the handle below the reel) make sure you are not introducing any jerky movements whilst doing so, as this hand should also assist with maintaining a smooth progressive acceleration throughout.
Improving your Snake Roll Cast
The cast we have discussed up to now has covered the Snake Roll in its basic form, which will hopefully be of help to those of you who are just getting to grips with this cast for the first time, however, some of you will already use this cast and would therefore like to improve on it, in which case you may have been intrigued by the comments I made earlier at the beginning of the article, (bullet point four) which highlights some of the benefits that the Snake Roll cast can offer us in a fishing situation through sections (a) to (f). To take advantage of these benefits we have to adapt the cast slightly from its basic form. This is not something new, as in years gone by many anglers have identified the need to do this to combat certain situations on the river. To understand this further, here is a brief explanation of the required technique.
Morphing the cast
I like to use the word morphing because by it’s very definition it refers to one shape being turned into another, and this is exactly what we are going to do to the shape of the fly line in the air (during the rotational stage of the cast) to help us improve upon the basic technique.
So Let’s Take a Look
With the conventional Snake Roll cast we lifted the rod tip (from a downstream position) up to a position of around 45° below us, off our casting shoulder, (to release some fly line from the water surface) and slightly inward toward our own bank (only very slightly, as too much can result in the fly coming very close to you during the next part of the cast, or even wrapping around your rod). You can stop at this point if you wish, especially if you are new to the cast, (or even teaching the cast to someone else) as this allows you to break the cast down into stages. However, once you become proficient with it yourself, you will find that if you continue into the next movement without stopping, (seamlessly) you will tend to feel the rod loading to better effect, (progressively bending) affording you continuous contact with your fly line throughout the next stage of the cast, and therefore allowing you to maintain line tension more efficiently, resulting in a better outcome.
This is where the movement changes to create a more dynamic cast:
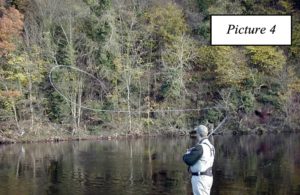 Instead of drawing the perfect circle with the rod tip, (as described earlier) we now want to squash that circle into the shape of a rugby ball laid on its side, this in turn helps us create a flatter, more dynamic cast. Therefore because we know that the fly line must follow the path of the rod tip in the air, all we need to do now to make this happen, is draw the shape of this rugby ball (with the rod tip) in the air beside us (i.e. out to the side of our body). As indicated, the fly line will then follow the rod tip, ultimately creating the same shape. (Draw this rugby ball shape with your thumb whilst setting up the cast and the rod tip has no other option than to do the same) (picture 4). Practice forming this shape in the air before moving to the next stage of the cast.
Analogy
To help you with this more dynamic movement, imagine there are two large horizontal bolts sitting above and below each other on an imaginary door (parallel to your casting shoulder) and the rod handle is also the handle of the imaginary bolts. Now as you approach the 45° lift position, simply push the top bolt in, (i.e. out above the water) and then pull the bottom bolt out, (i.e. back in towards your own bank) making sure that if you are using a double handed rod (as in this particular case) that your hands are working in opposing directions to each other (e.g. when the top hand pushes out, the bottom hand pulls in). (See Double Spey “Improving your cast”). This ensures you are flexing the rod properly, whilst at the same time compressing (squashing) the shape of the fly line in the air. As your fly line is rotated and drawn back to create what would have been your conventional D Loop shape in the basic Snake Roll, it will now create more of a V Loop on its side (rather like this >) behind the rod tip, for a more efficient cast (picture 5).
These movements allow you to establish three things:
 To draw your anchor point (end of fly line leader and fly) back to the required position on the water (parallel to your casting shoulder, a rod to a rod and a half length out from your side) much more efficiently. This is partly due to the extra line speed you will have generated throughout this more dynamic rotation, which can be especially useful if you are carrying a large amount of fly line in the air.
- To assist you in your attempt to maximize the amount of fly line (casting weight) behind your rod tip, therefore also assisting with the loading (bending) of the rod to maximum efficiency during the forward delivery, (picture 6) and
- Where required, it also gives you the option to keep the rod tip lower than normal due to the accelerated rugby ball shape (oval shape on its side) you have created in the air with the rod tip. This can be of great benefit if you have to make this cast under the low branches of overhanging trees, or other confined spaces.
 By tilting this rugby ball shape upwards during the initial rotation of the cast, (i.e. sending the rod tip high at the front) as apposed to keeping it parallel to the water, you will inevitably send the cast higher at the front too, affording you more time during the set up of the cast for a more relaxed and comfortable delivery (picture 4). This movement also prevents you from throwing your fly line, leader and fly in a downward direction during the initial rotation of the rod tip, this is a common fault with this cast, often resulting in a poor presentation, as any downward movement at this stage in the cast will inevitably make the fly line, leader and fly, descend faster, ultimately crashing into the water surface at speed. Try to avoid this where possible, as this is not only detrimental to the cast, but also to your fishing, especially if using a bulky, or heavier than normal fly. The forward delivery is the same as before (as described above).
In Conclusion
Although this improved technique can be very efficient, and tempting to try from the outset, it can also be quite dangerous if executed incorrectly, especially when learning the Snake Roll cast for the first time, This is because beginners will often bring their rod tip, and therefore their fly line, a bit too close to themselves during this more dynamic rotation, sometimes wrapping the line around the rod itself, or hitting the rod with their fly, or worse still, hitting themselves with the fly. For this reason I would only recommend moving on to this more advanced technique once you are comfortable with the basic Snake Roll cast itself, (as initially discussed above) it is then and only then that you will appreciate the improvements you have made, as well as gaining a better understanding of the cast in its entirety. I would also suggest that if you intend to use this cast whilst fishing with sinking lines, it will always be beneficial to raise your sunk line to the surface first, prior to initiating the Snake Roll cast, this can be done with the aid of the basic Roll Cast (see article 1). However, my personal advice would be to avoid this cast altogether when using sinking lines as there are far better and much safer casts for the job i.e. The Double Spey cast, (downstream wind) or the Circle C cast, (upstream wind) both of which have been discussed in previous articles. Also, whilst on the subject of safety, be aware that the Snake Roll cast, with a sunk line and a large, or worse still, heavy fly (brass tube etc) can be a recipe for disaster, and like the Snap T (as discussed in article 4) it is not a user friendly cast when adopting this combination. Also Remember, (as discussed in article 1) eye protection should be a major consideration when using any fly casting technique.
Additional Information
You may have heard some people refer to the Snake Roll cast as “simply a fancy platform cast used by instructors at Game Fairs”, but hopefully after reading this article you will agree that this is not so, and it may help you to focus on the positive reasons for using this cast in a fishing situation. One of the greatest benefits I have personally gleaned from using this particular cast (with both single & double handed rods) is the fact that it affords me the ability to target fish very quickly where required, as one rotation of the rod tip allows you to change direction in an instant, (as long as you make the initial rotation in the direction you wish to deliver the cast) even if your target fish shows upstream of you. This is great for trout, but it can also be particularly useful when salmon are running, and although (as salmon anglers) we all know that running fish are not the best takers, at least if we can instantly rotate our rod tip to target a running fish that suddenly shows again upstream of us, we are at least in with a chance!
Points to remember
Over the course of the last six articles we have covered several important points which are essential components of a good Spey Cast (as well as many other casts). So to keep them fresh in your mind here is a short list of these recommendations:
- Left hand up left foot forward, Right hand up right foot forward. (Guide Only)
- For best results do not begin your cast until the fly has fished out.
- Try to keep your anchor point adjacent to your casting shoulder.
- Make sure you maximise your D loop where possible.
- Introduce a slight outward cant of the rod tip when creating your D Loop.
- Make sure your D Loop is set up to face your intended target.
- Avoid delivering your cast with crossed hands. (Double handed rods).
- Maintain a straight line path throughout the delivery of the cast.
- Where conditions allow, produce a high delivery during the forward cast.
- Make all movements smooth and progressive, especially the delivery.
- Try to keep your fly line under tension throughout the cast.
- Manage your fly line in loops when shooting line for distance.
I hope there has been something in this series of Spey casting articles for everyone, and for those of you who have taken the time to read and digest the contents of all six, it’s now time to get out there and put some of these techniques into practice and if you need any further help, you know where I am.
All six articles can be viewed here under the heading of Six of the Best Spey Casts